

Even with the rapid approach of October, Oregon was stubbornly staying dry and warm. It was as if the very state itself was trying to stretch out the last of summer days for us! Perhaps some people were dismayed to wake up on Wednesday to a cloudy, rain-drenched world, but this is the greatest signal that lovely fall days have finally arrived. Oregon is well-known for luscious greenery and ample crop fertility, yet many fail to recognize the gloomy, damp days as the hero of the story! Without plenty of rainfall and chilly mornings, particularly during this part of the year, we would not be able to enjoy the beautiful changing of the leaves or the bountiful pumpkin patches everyone looks forward to. Take a look at the science behind why the leaves change color in Oregon, and then try some of the leaf-themed crafts to brighten up your home!
Rain, Leaves, and Chemistry
I had the opportunity to stand with my family at the dock on Trillium Lake a few autumns ago, enjoying the crisp breeze, scattered clouds, and stunning view of Mount Hood. We were soon joined by another couple, some travelers visiting from Iran. They were very friendly and started up a conversation. We were chatting pleasantly about their road trip and the sights they had already enjoyed during their days in Oregon when the man gestured grandly to the trees around us. He commented how amazing it was to see so many colors, mentioning that nothing like this happens in his hometown. I was just as warmed by the joy in his voice and the sparkle in his eyes as I was confused. Being raised here, I never even questioned the fact that the leaves offer such visual variety each fall. To me, this was a common and mildly appreciated marking of the season. To these travelers, however, those hues of yellow, red, and green were a unique and exquisite display! It had never occurred to me that there were areas of the world that do not witness the leaves change in the fall, and now I share with you what I learned after that chance meeting on the lake:
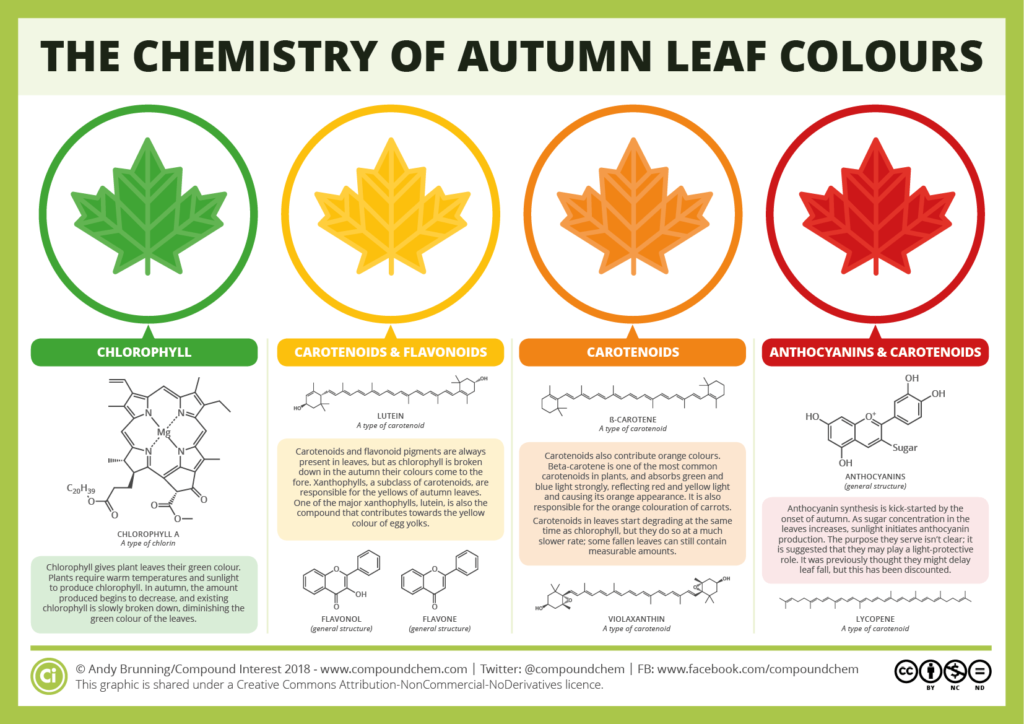
Mid-October to November are the best weeks to see the leaves change. It begins with the trees at higher elevations first, such as within the Cascade range. Greens give way to gold and melt into oranges and red before falling, sometimes managing to cling to bare branches into Thanksgiving time. However, the chemical reaction of leaf color change cannot be initiated without lots of moisture and cool temperatures! If you were living in Oregon during the wildfires of 2020, you might have noticed that the leaves fell while still green, and the autumn seemed oddly dull and mild. There was record warmth and dryness that season, causing our leaves to fall before changing! The intensity of color change depends entirely on the right combination of temperature, light, and water supply. We are lucky that Oregon holds the key to the magical combination of vivid fall leaves! Check out the diagram below for the nitty-gritty chemistry details and this article for more details on which specific colorful trees you are seeing this season.
Crafting with Leaves
Not only are colorful autumn leaves enjoyable outdoors, but they can also easily be brought inside and used for many different decorations! The crafts listed below can be done with either freshly pressed leaves or fake ones purchased from any craft or dollar store. There are certain advantages to using both, so I encourage you to embrace trial and error to see which your family likes best.
There are a couple of options for pressing fresh leaves gathered from your own outdoor adventures. If you’re not itching to get crafting immediately, you can place fresh leaves between the folds of plain paper and put them near the end of a large dictionary or oversized textbook. Let your leaves rest, pressing and drying between the book pages for at least a few days or even until next year! For those who want to use their gathered leaves right away, I recommend placing them between sheets of wax paper and ironing both sides with the iron on medium-low until desirably dry and flat. This method also adds a small layer of wax to the leaves, which can assist in specific projects (such as the clay impressions activity below).
Now that the fresh or store-bought leaves are ready to be used, here are a couple of different projects to use them in!
Tea Light Leaf Jar
Clean off almost any glass bottles from the recycling bin and grab a can of spray adhesive–you will create an amazing ambiance in no time! As a pro tip to eliminate extra mess and hassle, find an old fast-food drink cup that fits snugly inside the opening of the glass jar you intend to use for this project. By using the plastic or paper cup as a stand and handle, you can coat the jar without having to touch it, and it also keeps the inside of the jar clear from adhesive drips! Add a first layer of the spray adhesive to the jar and start pushing on your selection of leaves. Layer by layer, add leaves and adhesive until the jar is a patchwork of beautiful colors. Be aware that the thickness of the leaf layers should not be too dense to allow gentle candlelight through. One to two leaves layered over each other will appear as delicate and intricate as stained glass! Allow plenty of time, a day or two even, depending on the thickness of the additions, for the jar to dry before placing it on the mantelpiece and adding a tea light. To kick it up a notch, consider using thin strips cut from decorative fall napkins as layers in the adhesive as well as leaves. Then, top it all off with a nice orange or other fall ribbon tied into a bow around the opening.
Clay Leaf Impressions
Molding clay is an incredibly affordable crafting material with lots of different uses. This particular project can be customized in endless ways, so do not stop at these basic details! First, you will need to purchase whatever amount and colors of molding clay you find appropriate for the gathered leaves you want to use. By laying out some wax paper as a crafting surface, you will keep tables and counters clean while you mold the clay into any desired shape. Bowls, plates, trinket boxes, spoon rests, or plant pots are all great choices! Do not stress about it being perfect because there are bound to be a few unintended “adjustments” to the shape of your item while you press leaves into the surface! Be creative with the placement and shapes of the chosen leaves. The textured surfaces of the leaves will dry impressions into the clay, leaving behind complex, gorgeous patterns when later pulled away from the surface of the dried clay item. I recommend using real leaves for this project, as the natural leaf surfaces and veins are much more unique than their man-made counterparts. However, real leaves are much more brittle and prone to break if pressed or pulled too forcefully. This is an activity you could try with your family repeatedly, at all points of the year, with wildflowers or pinecones or your own fingerprints! Oregon has a lot of natural blessings to embrace and utilize!

Michelle is a married mother of two toddler girls and a house full of pets. As a homegrown Oregonian, she enjoys spending her time on family adventures throughout the PNW to fuel her creative inspiration! Photography, crochet, freehand mandala designs, hiking, and gardening are a few of her hobbies that are highlighted on Instagram @xenonvogue. Each new day is a chance to be present and involved, so Michelle strives to live honoring the knowledge that this too shall pass.